Please note – Your supplier account will have one email address set up for receiving automated purchase orders. If you need more than one email address to receive the POs, we recommend you set up an Outlook email rule to auto forward it to the additional recipients.
When you are ready to submit an invoice for payment, locate the PO email notification and open it. Click the “Create Invoice” button.

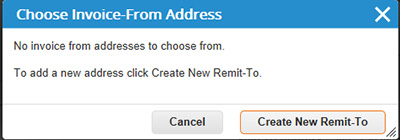
If this is your first time flipping your Purchase order the below box will appear.
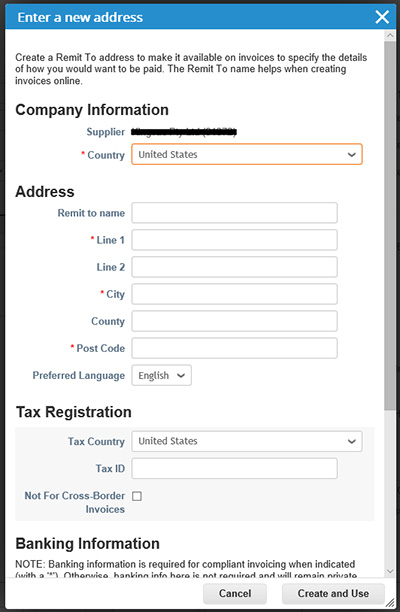
Click “Create New Remit-To”.
Complete Company Information, Address, Tax Registration (ABN).
Do not complete the Banking information section. Cleanaway will already have your bank account details.
Click “Create and Use”.
This will then take you to the Tax invoice Create Screen. Follow steps 1-8.
1. Enter invoice number exactly as per your TAX invoice (PDF Attachment).
Please note: This is the invoice number generated by your accounting system. Do not list multiple invoice numbers in this field or any additional letters or numbers.
2. Invoice date (amend if required) select the date from the calendar.
3. Attach your PDF invoice. Click on Choose File or add file. Attach PDF copy of tax invoice. 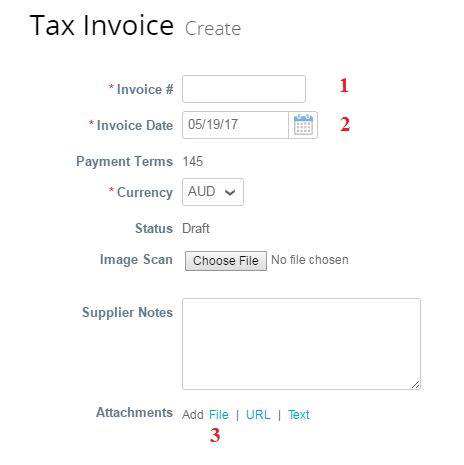
4. Check GST values per line then validate or amend the quantity and price of the item/service per invoice line. Example: You have an order for a quantity of 1 x $1000 Exc GST however the agreed cost was $1500 Exc GST. Change the price from $1000 to $1500 Exc GST. Click on the calculate button before submitting the invoice, the Inc GST amount at the bottom of the Invoice must be the same as your attached PDF invoice.
5. Delete any PO lines for items/services that you are not delivering/charging for on this invoice by clicking the red X sign (x).

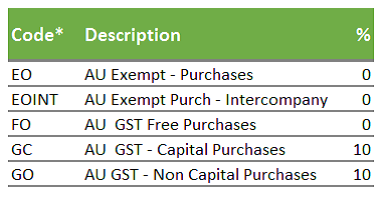
6. Select the correct tax description (AU GST- Non Capital Purchases will be the default type) DO NOT CHANGE tax figures.
7. Click “Calculate” and ensure the values being invoiced are the same as the values on your attached PDF tax invoice.
8. Click “Submit”.
Coupa will ask you to confirm you are ready to submit the invoice. Once you have clicked the send invoice button you will be directed to the invoices screen. 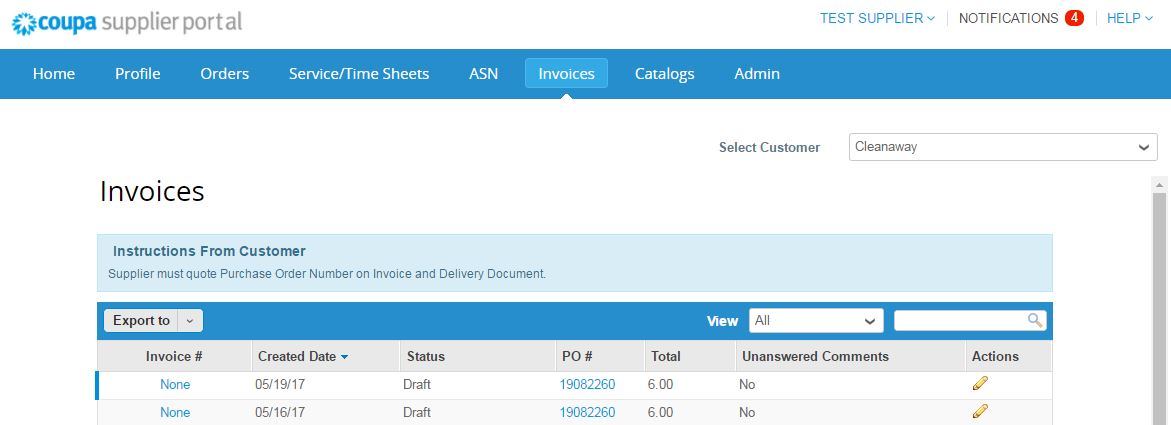
Additional notes
| Creating Multiple Invoices for a Single Purchase Order | ||
|---|---|---|
| If a single PO relates to multiple invoices from your accounting system, you must delete the irrelevant PO lines for each Coupa invoice created. In this example we use the one PO to create two invoices. | Example Invoice 1234 PO 1001 Line 1 – Verify Qty and Price Line 2 Delete (as not charging) Line 3 Verify Qty and Price Line 4 Delete (as not charging) | Example Invoice 1235 Go back into PO 1001 and select create invoice Line 1 – Delete Line 2 Verify Qty and Price Line 3 Delete Line 4 Verify Qty and Price |
Disputes
If there is a price discrepancy or misalignment between the supplier generated tax invoice and the invoice submitted in Coupa, Cleanaway will dispute the invoice for you to edit and resubmit. Disputes are communicated by email notification providing a reason for the dispute. A comment from Cleanaway will be shown regarding the action to be taken.
As a supplier you are required to correct the discrepancy and resubmit. In your ‘Invoices List’, a disputed invoice will have a ‘disputed’ status with an edit button to the far right (pencil image).
![]()
When you click on the edit button you will be taken back to the Tax invoice create screen to resubmit the invoice, there you can correct the error and resubmit.
Add freight to an invoice
If the purchase order does not include a freight line Option 1: Please add the freight value to the unit rate of an existing line then add a note to Supplier notes field under image scan advising additional charge. 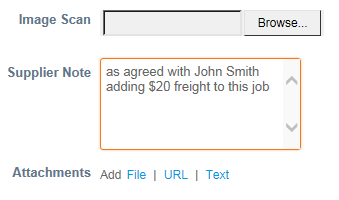
Option 2: Contact the purchase order requestor to add a line to the purchase order for freight.
For additional support please email coupahelp@cleanaway.com.au.